Building an Integrated Airborne MeshCore / Meshtastic Repeater Inside a DJI Air 3
Overview
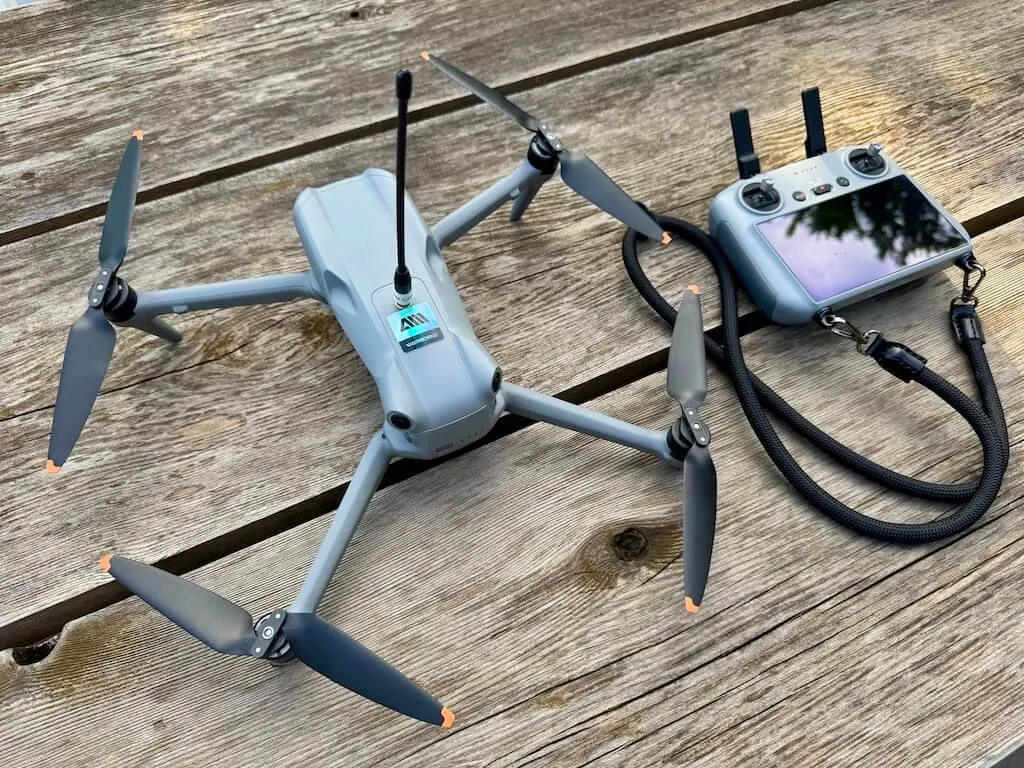
This project documents an integrated airborne MeshCore / Meshtastic repeater built into a DJI Air 3 using the drone’s onboard cellular dongle compartment as both the mounting location and power source.
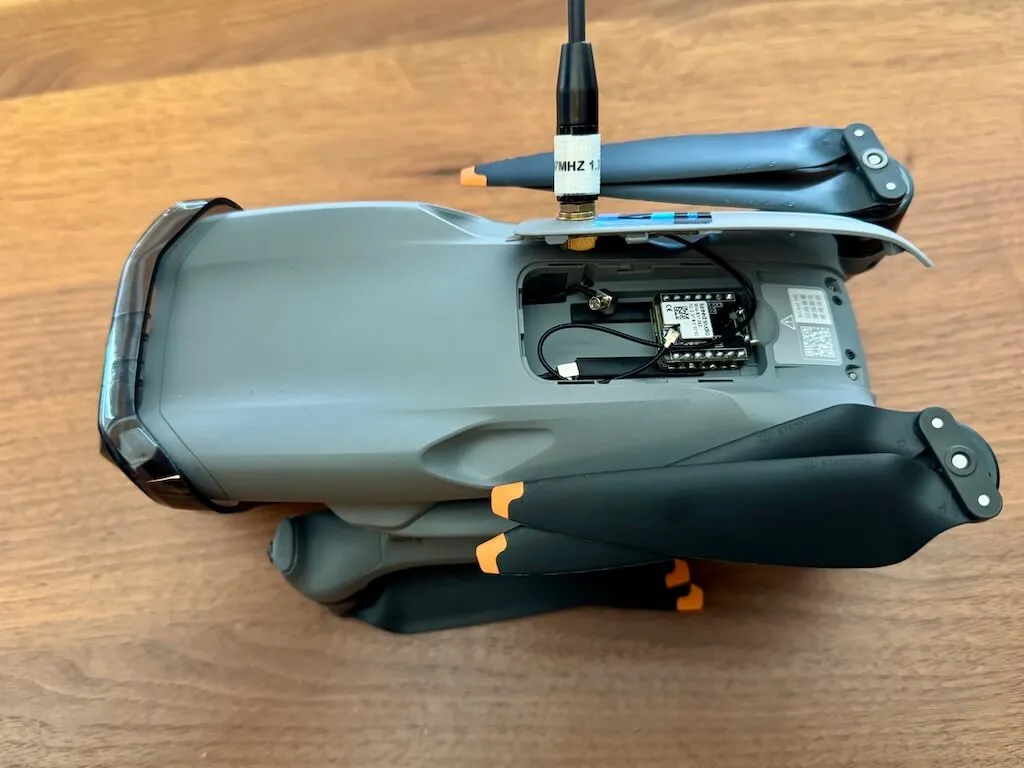
DJI designed the Air 3 with an internal compartment for the DJI Cellular Dongle 2. That compartment includes a small USB-C cable that powers the dongle when the aircraft is on. Instead of using that space for DJI’s cellular dongle, this build uses it to house a compact mesh node, with an external SMA antenna connector mounted through a replacement dongle cover.
The node works great with both Meshtastic and MeshCore. The Seeed Xiao nRF52840 plus Xiao SX1262 radio board combo is fully supported, so there is no custom firmware work, board hacking, or unusual software setup required. Once the node is assembled, you can flash it like a normal supported device and configure it for whichever mesh platform you want to use.
It should also be one of the more power-efficient node configurations possible because there is almost nothing extra on board: just the nRF52 microcontroller and the SX1262 radio. There is no screen, GPS module, onboard battery, charger circuit, case lighting, or other accessory hardware drawing additional power. For an aircraft-powered repeater, that matters. The less power the node consumes, the less it pulls from the drone’s flight battery.
The main benefit is a cleaner, lower-drag airborne repeater. Compared with externally mounting a node, battery, wiring, and antenna, this setup keeps almost everything inside the drone body. Even though the node pulls power from the flight battery, the reduced weight and wind drag should theoretically create a net positive compared with bulkier external setups. In practice, that should help the drone handle better in light wind and may preserve more usable flight time in ideal conditions.
DJI Compatibility
This write-up is based on the DJI Air 3.
The important requirement is not just general DJI cellular dongle support. The drone needs the internal cellular dongle bay with the USB-C cable in the rear/trunk area. DJI states that the Air 3 can accept the Cellular Dongle 2 directly inside the aircraft body without an additional mounting kit. DJI also lists models such as the Air 3S and Mini 4 Pro as Cellular Dongle 2-compatible, but the Mini 4 Pro uses a separate mounting kit, so it is not the same internal layout as the Air 3.
Before building this, confirm your exact drone has:
- the internal dongle compartment
- the small USB-C cable inside the compartment
- power from that USB-C cable when the drone is turned on
- enough physical room for your node
- no interference with the cover, screws, antenna lead, or USB-C connection
I tested the port on my unit with a tiny USB-C light before committing to the build.
Parts and Tools
You’ll need:
- DJI Air 3, or another physically confirmed-compatible DJI model
- Seeed Studio Xiao nRF52840 & SX1262 NOT the Kit as it is too tall. More info below
- right-angle SMA bulkhead to IPEX / U.FL cable
- replacement OEM cellular dongle slot cover
- small Phillips screwdriver
- small hand files or sandpaper
- drill
- antenna, such as the Gizont 17 cm or similar clone
Buy an extra OEM dongle slot cover before modifying anything. Keep your original cover untouched in case you ever want to return the drone to stock condition, sell it, or deal with warranty service.
The Custom Mesh Node
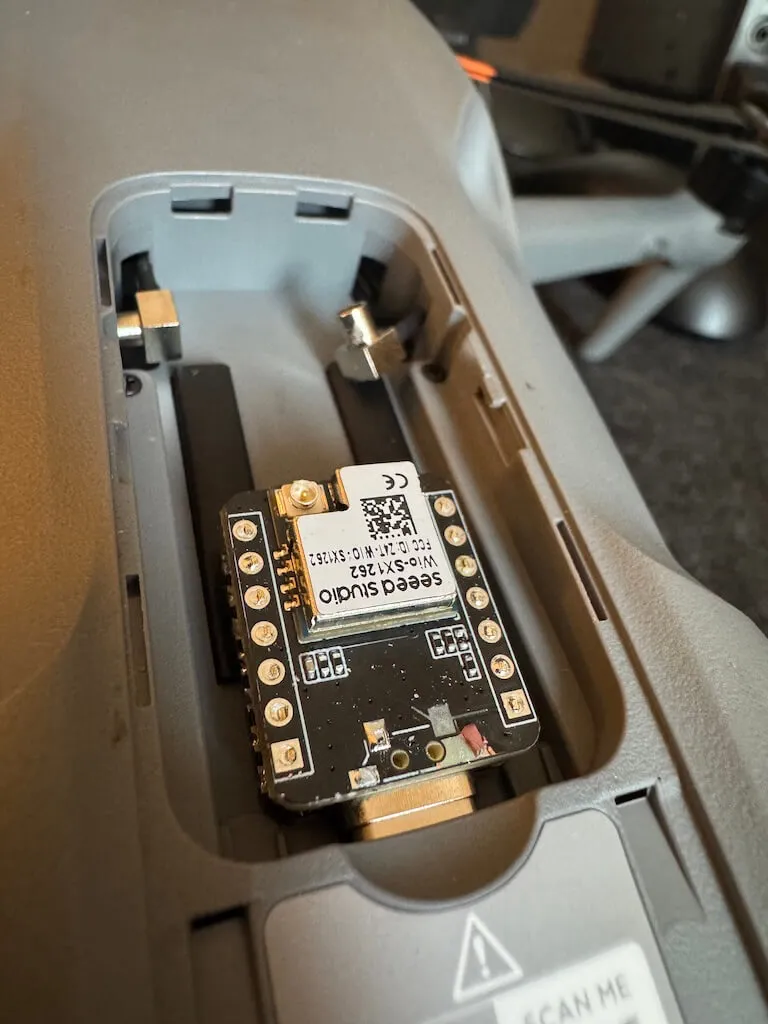
The node is built from a compact Seeed Xiao stack:
- Seeed Studio Xiao nRF52840
- Seeed Studio Xiao SX1262 radio board
The SX1262 radio board sits directly on top of the Xiao nRF52840, and the two boards are soldered together into one compact unit. The key requirement is height: the boards need to sit as flat and flush as possible. The tolerances inside the Air 3 dongle bay are extremely tight, with less than a millimeter of clearance in some areas.
The node is intentionally minimal: just the nRF52 board and the SX1262 radio. That keeps the physical size small, reduces heat, and should make it one of the more power-efficient ways to run an airborne Meshtastic or MeshCore repeater from the drone’s internal USB-C power. Since there is no display, GPS, battery charging circuit, or extra accessory hardware, nearly all of the power draw is going toward the microcontroller and radio itself.
Some Xiao nRF52840 boards have a small pushbutton switch installed. If yours has this switch and it prevents the SX1262 board from sitting flat against the nRF52840, remove it before soldering the boards together.
This is not just about making the electronics work. The mechanical fit matters just as much. Excess solder, crooked alignment, extra header height, or a slightly uneven board stack can make the assembly too tall to fit. If the node is too tall, the cover may press on it, the USB-C connection may cant sideways, or the node may lose power when the cover is tightened.
Build and test the node outside the drone first. Confirm that it boots, flashes correctly, talks to the radio, and works with the antenna before installing it in the aircraft.
Basic node build order:
- Remove the pushbutton switch if it prevents the boards from sitting flush.
- Stack the Xiao SX1262 radio board directly on top of the Xiao nRF52840.
- Align the boards as evenly and tightly as possible.
- Solder the boards together while keeping the assembly low-profile.
- Attach the IPEX / U.FL end of the right-angle SMA bulkhead cable.
- Flash and test the node.
- Confirm it powers correctly from the drone’s USB-C cable.
Removing the Dongle Cover
Remove the drone battery. Inside the battery slot, the dongle cover is held in place by two small captive Phillips screws. Loosen those screws and remove the cover.
Inside the compartment, you’ll find the USB-C cable and two small internal antenna connections. Those antenna leads are meant for DJI’s cellular dongle and are not used for this MeshCore / Meshtastic build. Handle them carefully and gently feed them back into the drone body so they are safely out of the way. Do not pull, crease, sharply bend, or damage them.
Set the original dongle cover aside. All cutting, filing, and drilling should be done on the replacement cover.
Fitting the Node
This is the most delicate part of the project.
The inside of the replacement dongle cover has small ridges and structural details that may interfere with the node. Slowly file or sand those areas down until the node can sit inside the compartment and the cover can close flush.
Go slowly: remove a tiny amount, test fit, remove the cover, adjust, and test again.
The final fit should be snug but not forced. The cover should not need to be cranked down with the screws. If it does, something is too tight.
Avoid:
- tension on the cover tabs
- tension on the captive screws
- pressure on the USB-C connector
- bending the node
- canting the node sideways on the USB-C plug
- pinching the antenna pigtail
- cutting power when the cover is tightened
The node barely fits when done correctly. Sub-millimeter differences matter.
Installing the SMA Connector
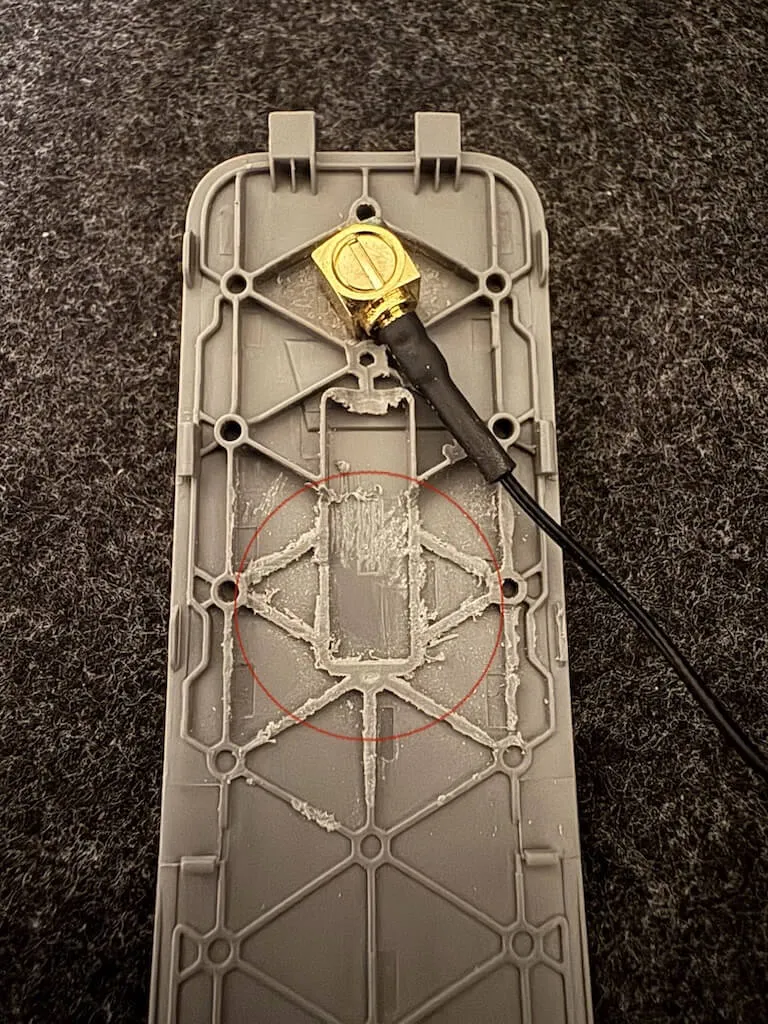
Drill the replacement dongle cover for the SMA bulkhead connector. The exact position matters, because the connector, pigtail, node, USB-C cable, and cover all have to fit in the same very small space.
Use a right-angle SMA bulkhead to IPEX / U.FL cable. A straight connector is unlikely to package cleanly inside the bay.
Mount the SMA bulkhead through the cover, attach the IPEX / U.FL end to the radio board, and test fit the full assembly. Expect to go back and forth several times before everything sits correctly.
Final Bench Test
Before flight, power on the drone and confirm:
- the node boots from the drone’s USB-C cable
- the node stays powered when the drone is gently moved
- the cover sits flush
- the screws are not under stress
- the SMA connector is secure
- the antenna clears the body and props
- the antenna pigtail is not pinched
- nothing rattles inside the compartment
If tightening the cover causes the node to lose power, the fitment is still wrong. The node is probably being pushed off-axis on the USB-C connector.
Antenna Notes
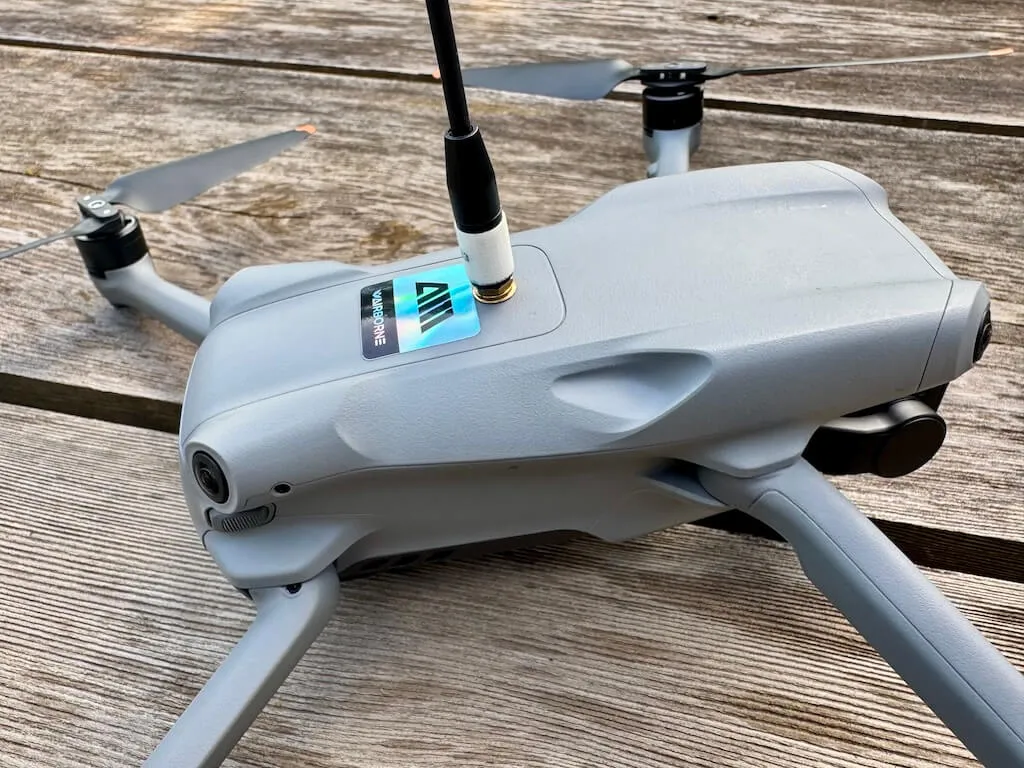
You can experiment with antennas, but I’ve had good luck with the Gizont 17 cm antenna and similar clones.
For an airborne repeater, altitude does a lot of the work. A practical, reasonably efficient antenna can perform very well from the air without needing to be huge. Avoid oversized antennas that add leverage, vibration, drag, or stress to the SMA mount.
Flight Testing
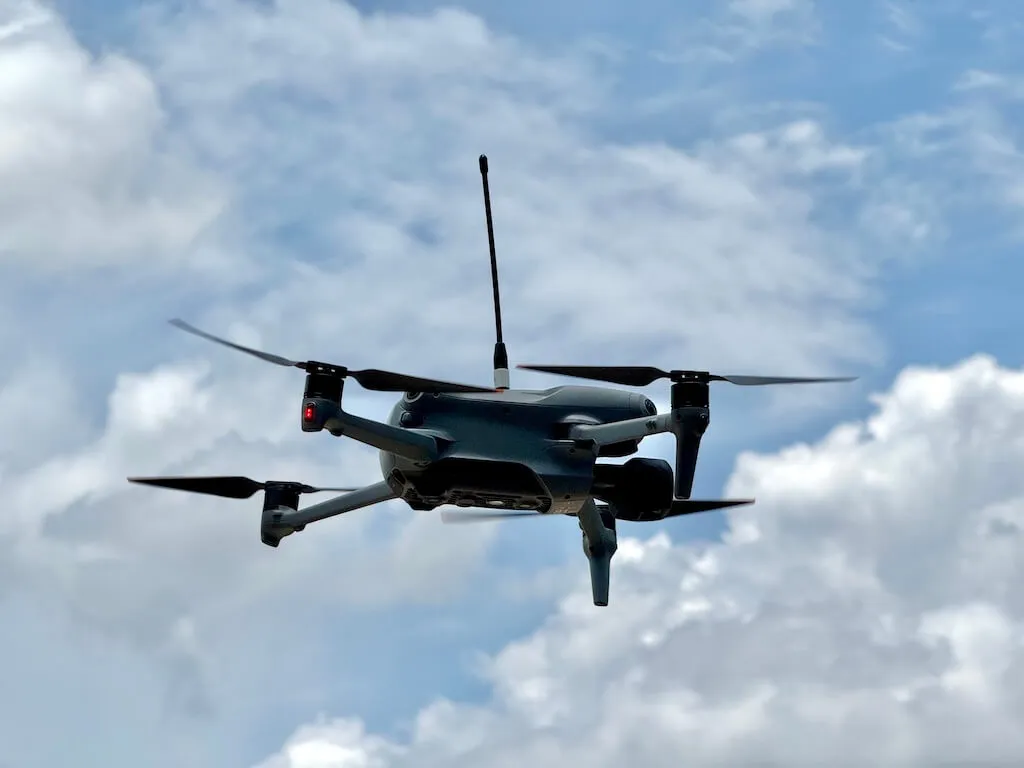
Do not make the first test a normal flight.
Start low, close, and over a soft surface. Confirm that the aircraft behaves normally with the node and antenna installed. Watch for vibration, instability, warnings, overheating, signal issues, or anything unusual.
A safe first test is simple:
- Power on the drone.
- Confirm the node boots.
- Confirm the node is visible from the ground.
- Take off gently.
- Hover low.
- Check stability.
- Land.
- Inspect the cover, connector, antenna, and node.
Only after that should you gradually test higher altitude, longer duration, and real repeater performance.
Final Thoughts
This build turns the DJI Air 3’s cellular dongle compartment into a clean, low-profile airborne MeshCore / Meshtastic repeater bay. The advantage is that the drone carries the node internally, avoids a separate external battery, and minimizes the wind drag and weight penalties of a strapped-on repeater.
The tradeoff is fitment. The node, USB-C plug, SMA pigtail, antenna connector, internal antenna leads, cover ridges, tabs, and screws are all fighting for the same tiny space. Build the node as flat as possible, modify the cover slowly, and do not force anything.
When done correctly, the result is a much cleaner airborne repeater that should handle better in wind and may offer better usable flight time than a bulkier external setup.