
MeshCore Setup
Overview
- Buy a radio (our recommendations)
- Flash device using your browser: https://flasher.meshcore.io/
- Pick a role:
- Companion: Bluetooth; pairs with your phone to send messages.
- Repeater: No Bluetooth; repeats only. Follow instructions below
- Use the USA/Canada Recommended preset.
- For repeaters, include alternate contact info in the Owner Info setting such as email, phone, or Discord handle
Config
| Setting | Value |
|---|---|
| Preset | USA/Canada Recommended |
| Frequency | 910.525 MHz |
| Bandwidth | 62.5 kHz |
| Spread Factor | 7 |
| Coding Rate | 5 |
MeshCore Setup Walkthrough
1) Hardware/Radio
You’ll need a radio to get started. Prices range from $13 - hundreds. Many sit in the $30-80 range. MeshCore works on (almost) all the same hardware as Meshtastic.
Find our suggested hardware on the devices page.
2) Choose a Role: Companion vs Repeater
Companions are the radio you’ll send messages from. Repeaters are coverage extenders that must be configured before mounting.
3) Flash the Firmware
- Open flasher.meshcore.io.
- Connect your device via USB and select the correct port/board.
- Select the role(typically Companion Bluetooth or Repeater)
- Enter DFU
- Recommended: If you plan to install a repeater in a location that is harder to get to(requires a ladder for instance) we strongly recommend flashing the latest OTAFix before flashing the MeshCore firmware.
- Erase the device
- Flash the role firmware.
- For repeaters, click “Repeater Setup” (see below).
4) Configure
Companion
- Download the MeshCore app to your phone and pair with your radio over Bluetooth.
- Set Region/Preset = US Recommended.
- Do not adjust frequency, bandwidth, spreading factor, or coding rate.
- Set your name. This will be visible to others on the network. Set position if desired.
- optional but recommended: turn on 2-byte path size under Experimental Settings. (Learn more about Meshcore 2-byte routing)
- Send a Flood Routed Advert (signal/wave icon at top of app).
- Remember, you may not see other contacts right away. Allow 24-48 hours for Contacts to populate in your list.
Repeater
- After flashing is successful, click Repeater Setup on the same page.
- Set Selected Present to USA/Canada Recommended.
- Set the name and position as desired. Positions are exact.
- Leave the guest password blank so others change view telemetry and owner info.
- Set the owner info to include alternate contact information like email, phone, or Discord handle.
- Set the admin password. Save this somewhere! You’ll use it soon.
- Turn on 2-byte path mode via console with command
set path.hash.mode 1(learn more about Meshcore 2-byte routing). - Based on the number of neighbors, tune settings based on the table below.
- Reboot
- Send an advert and make sure your new repeater shows up as a contact in your companion device
- Disconnect your computer, connect solar and battery
- From your companion node
- Log in (tap on the new contact, enter admin password set in the step above
- Go to Settings > Sync Clock
- Deploy/mount the repeater.
Neighbor count configuration tuning
Apply the settings that match the number of neighbors your repeater currently sees, entered via the MeshCore app CLI or meshcore-cli. As your node sees more neighbors over time, revisit and update these values.
| Neighbor Count | 0–1 | 2–4 | 5–9 | 10–14 | 15+ |
|---|---|---|---|---|---|
set txdelay | 0.3 | 0.5 | 1 | 1.5 | 2 |
set direct.txdelay | 0.1 | 0.3 | 0.5 | 1 | 2 |
set agc.reset.interval | 4 | 4 | 4 | 4 | 4 |
set multi.acks | 1 | 1 | 1 | 1 | 1 |
set rxdelay | 3 | 3 | 3 | 3 | 3 |
5) Channels and Use
- Austin Mesh uses the default Public channel that is automatically configured.
- Other channels include #meetup, #jokes, #music, #bot, and #testing
- Send your first message in Public.
- Does it say “Heard {x} repeat(s)”? If so, that means you’re connected!
- If not, try moving your radio. Follow the rule of Height > Antenna > Power.
- Send away! It is perfectly acceptable to send a lot of messages, especially in the #testing channel!
- Having trouble? Join our Discord server for more advice.
Resources
- MeshCore FAQ/Wiki: Wiki
- Online flasher: flasher.meshcore.io
- MeshCore vs Meshtastic: austinmesh.org/about/meshcore-vs-meshtastic/
MeshCore 2-byte vs 1-byte paths
Every node(radio) on the network gets a nickname. In 1-byte mode that’s something like a1. In 2-byte mode that’s a1b2. 1-byte conflicts at 256 unique nicknames while 2-byte has 65,536.
Explaining key-prefixes
Every node in the mesh has a Public Key. The first characters of that key are treated as the address so other nodes know how to route messages. With 1-byte paths(the first 2 characters of the public key), there are only 256 possible nicknames to go around, so as the network grows, more and more nodes end up sharing the same one. When that happens, messages can get handed off to the wrong node and routing breaks down.
2-byte paths use the first 4 characters of the public key, allowing 65,536 possibilities instead of 256. More room, fewer mix-ups, much healthier mesh as it grows.
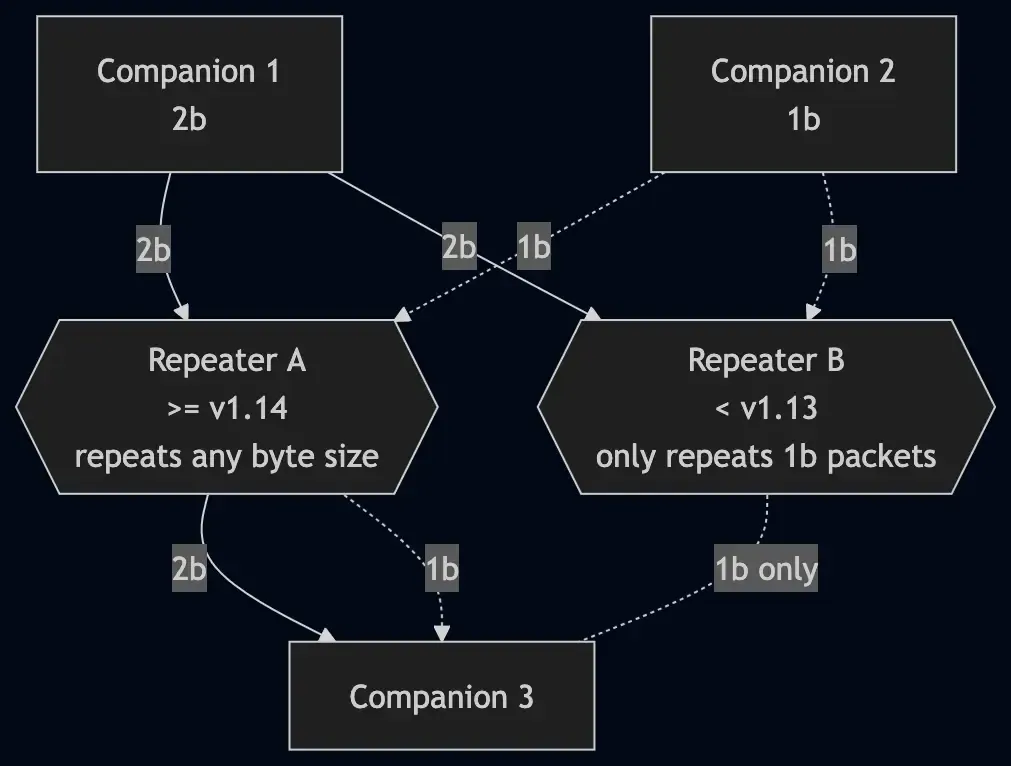
The catch(es): every repeater between you and the person you’re messaging has to understand 2-byte nicknames, or it’ll drop the message. That means firmware upgrades. It also reduces the max number of hops from 64 to 32.
Requirements
- Repeaters: firmware 1.14 or later. Older repeaters can’t forward 2-byte paths.
- Companions: firmware 1.14 or later, plus the latest phone app (the toggle lives under Experimental Settings).
If any repeater in the path is on older firmware, 2-byte traffic won’t make it through. Plan upgrades accordingly.
Turning it on
Repeaters
- Upgrade to at least 1.14
- Connect to the repeater’s console and run:
set path.hash.mode 1
Companions
Companions need an extra step to actually send messages using 2-byte paths:
- Confirm the companion is on firmware 1.14 or later.
- Open the phone app.
- Go to Experimental Settings.
- Set Default Path-Hash Size to 2-byte (max 32 hops).
Once that’s on, messages from the companion will use 2-byte paths when available.